Contents:

Needlework FAQ:
Counted Cross Stitch Tutorial
Chapter 2
Reproduced by: Crosstitch.com
with permission. All Rights Reserved.
- Discusses everything from selecting the fabric to framing the picture (and most things in between).
- Browse through the topics by clicking on the table of contents on the left, or just scroll down.
- The hints and tips contained here have been collected from many people who have been kind enough to share their wisdom with the rec.crafts.textiles.needlework Usenet newsgroup.
16. Preventing Twists and Knots:
Separate the floss into individual strands and then recombine them. This is known as "stripping" the floss. There is less twisting and knotting, and the stitches lie flatter. To separate a thread from the others, hold onto the top end of the thread between your thumb and forefinger. Pull down on it with the other thumb and forefinger, taking all the other threads with you. It looks like a knot will form. Have faith. Everything comes out just fine.
Run each separated strand of floss over a damp sponge just before using it. This makes the floss lie much smoother and flatter. Some fibers, such as silk, should not be dampened.
If you know which direction you tend to twist the needle, give it a little bit of a twist the opposite direction after each stitch.
Try threading the needle with the "right" end of the floss. See section "31.3 The Right End of the Floss" in chapter 3 for more information.
Let the thread dangle every so often and untwist it.
16.1 Railroading
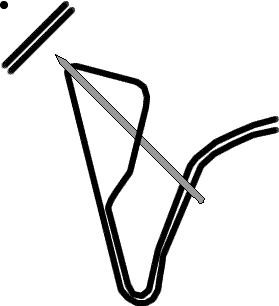
You can use a technique called railroading to prevent twisting. On the top half of the cross stitch, pull the needle and thread through to the front to start the stitch in the usual manner. Then put the tip of the needle between the two threads right where they come through the fabric so that the needle is pointing in the direction it needs to go to complete the stitch, and take it over to finish the stitch.
The dot in the diagram below represents where the needle is must go to complete the stitch.
In case the directions above don't make sense, here is another description.
From: Martha Beth Lewis ...
Here is some lovely ascii art to get you started:
                                             #

                                          x


                                     o
Bring the needle to the front of the work at o. You'll be going down at x, but don't do anything yet.
Take the thread coming out of o and lay it -on the surface- of the work. Put your finger at # on the two threads and hold them to the surface of the work. The threads should be lying from o to #, crossing x. Imagine they are two golf clubs lying parallel to each other on either side of the cup (the "cup" in this analogy is x).
Keeping your finger at #, put the needle in at x -between- the two threads. Lift your finger from #.
Now pull the thread all the way to the back. You will see that your two threads are lying perfectly parallel.
What railroading does is eliminate the twist in the thread, causing the stitch to lie beautifully bcs the two strands are completely parallel. The twist in the thread is actually transferred further up the tail of the thread, so you'll have to untwist a little more often than if you are not railroading your sts. By this I mean let the needle dangle from the underside of your work.
Railroading also makes the surface of the work flatter, improves floss coverage, and (some say) maximizes light reflected by the floss.
Railroading adds time to each stitch. Those who stitch in competitions railroad all the time. Judges can tell the difference.
A short cut is to railroad only the half of the stitch that lies on top, as this is the one that is seen most clearly, although some stitchers say that they can see the bottom leg of the stitch clearly, too.
Try an experiment. Do a row or two of "unrailroaded" and some of "full railroaded." You'll see a definite difference. Now do a row of "half railroaded." What do you think? Is there enough of a difference to merit the extra time?
You get used to railroading and it becomes second nature, but it does add a lot of time to finishing the project. It's up to you whether you think the result is worth the extra time. As I mentioned above, judges seem to know the difference!
16.2 Laying Tools
A laying tool can help keep threads untwisted when you stitch with multiple strands of floss and other fibers. Using it requires an extra hand, so having the needlework in a frame on a stand helps.
Many things can be used as laying tools--a very large tapestry needle, a very small knitting needle, a trolley needle, or even a real laying tool.
Start your stitch by pulling the needle and thread through to the front as usual. Lightly pull the thread away from the direction of the stitch. Use the laying tool to stroke the thread against the fabric near where the thread emerges from the fabric. This should make the strands lie flat and parallel. Complete this part of the stitch by putting the needle into the fabric and pulling it to the back as usual. As you pull the thread through to the back, use the laying tool to keep a small amount of tension in the thread. This will keep those newly stroked strands parallel.
17. Where Am I?
There are many approaches to keeping track of location. Find the method that is easiest for you:
- Mark off the symbols on the chart with a highlighter or pencil as you finish the corresponding stitches.
- Some people like to see the shapes of the different areas. Color in the entire chart before starting to stitch, using distinctive colors for each symbol. The colors don't need to be close to the real floss colors.
-
A suggestion from Judy Latting ... combines the
two above methods...
- Using highlighters, I use yellow to mark the symbols of the color I am going to work with next. I have the symbol count in my pattern info, so I count as I go to make sure I get them all. This allows me to plot the most efficient course of stitches that I can through the chart. As I complete these stitches, I go over the yellow with a pink highlighter. Now when I look at the chart, anything that is orange is done.
- Laminate the chart with clear contact paper. Mark off the parts as you finish them with a fine tip dry erase pen. The chart can be wiped clean with a paper towel when you are through. Be careful not to get the ink against your project.
- Put the chart on a metal board, and use a magnetic straight edge that can be moved along the chart as you stitch. A variation on this is to use non-magnetic plastic strips on a non-metal board.
- Use Post-It notes. They are easy to move, and very portable.
-
Baste a grid onto the fabric. Some people like a 10x10 stitch grid. Others
just use one horizontal and one vertical line through the center. A variation
is to baste a small "ruler" near the edge of the fabric, outside the
area of the picture. Be careful to use a thread color that doesn't show too
strongly against the fabric, just in case the basting thread leaves little
fuzzy remnants behind. Use a thread that can't be pierced with your needle so
that the thread can be pulled out easily when you are finished. You can pull
the thread out as you reach it, or stitch over it and pull it out later. Some
people find that monofilament and quilting threads work well. Experiment to
find out which method works best for you.
A word of caution--if you use a grid, do not completely fill in each square one-at-a-time. The squares may show up in your finished stitching because of the change in tension at the end of every row in every square. - Count twice. Count from two different locations.
18. Stitching On Linens and Other Evenweaves:
An evenweave is any fabric which has the same number of threads per inch in both the vertical and horizontal directions. The individual threads might not all be the same thickness--you can see this in linen--but the number of threads are the same. Evenweave fabrics may be made of linen, cotton, man-made fibers and blends.
Linen may be an evenweave or an unevenweave fabric. Sometimes an unevenweave linen is used when recreating an old sampler. For the purposes of this FAQ, we'll assume we're always discussing evenweave fabrics.
For a look at the "aida vs. linen" debate, see section "1. Selecting the Fabric - Aida vs. Evenweaves/Linen".
There is a traditional rule which says to stitch on aida using a hoop and stitch on linen "in the hand". In actual practice, people do whatever works best for them. See section "6. Hoop or Hand?" for a discussion of the "in-the-hand vs. in-a-hoop" debate. See section "30.2 Hoops, Scroll Bars and Such" in chapter 3 for more information on the equipment itself.
Evenweaves are generally worked "over two" threads. This means that a 28 count (28 threads per inch) linen produces the same size picture as a 14 count (14 squares per inch) aida.
Experienced stitchers of evenweaves recommend starting next to a vertical thread. This is easier to explain using a picture.
If you start your X's like "/", then...
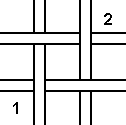
Come up at 1 and go down at 2 (or vice versa). If you start your X's the other way, like "\", then...
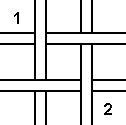
Reasons for starting next to a vertical thread:
- Stitches started next to horizontal threads sometimes can roll under to the back side of the fabric.
- Starting next to a vertical thread makes it easy to tell when you have mistakenly gone over 1 or 3 threads.
19. Stitching Over One:
Stitching "over one" refers to stitching a picture on linen or another evenweave over one fabric thread. This is often done with one strand of floss, or "one over one".
In the previous section, we found that stitching over two threads of a 28 count linen produces the same size picture as a 14 count aida. But stitching over one thread of a 28 count linen produces a picture only one quarter the area.
There can be a problem with stitches rolling or slipping to the wrong side of the fabric. This is much less likely to happen when each X is completed before starting the next. There are additional techniques to prevent the problem. Two are described below.
Intersections
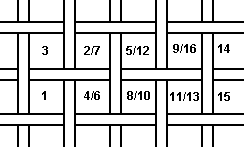
On the diagram below, come up through the fabric on the odd numbers and go down on the even.
Each X goes over one thread intersection of the fabric. Each fabric intersection has either a horizontal fabric thread on top or a vertical fabric thread on top.
Suppose you make the first half of the first stitch by coming up at 1 and going down at 2. Your stitch is going over a horizontal fabric thread. Because of this, you should go horizontally underneath to find the starting hole for the second half of the cross stitch. So, come up at 3 and go down at 4.
Make the first half of the next stitch. Because you just went down at 4, you must come up at 5 and down at 6. Your stitch is going over a vertical fabric thread. Because of this, you should go vertically underneath to find the starting hole for the second half of the cross stitch. So, come up at 7 and go down at 8.
Continental Stitch
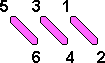
A second approach uses the Danish method of doing the bottom stitches first along a row, and completing the X's on the return trip. But to prevent the stitches rolling to the wrong side of the fabric a continental stitch is used rather than a half stitch. This looks like a half-stitch from in front, but the back is a long diagonal. For these diagrams, come up at the odd numbers and down at the even.
On the outward trip:
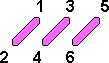
On the return trip, to complete the X:
20. Tweeding:
Tweeding, sometimes called blended needle or blended thread, is the use of two or more colors of thread in the needle at the same time.
How the two colors should lie in relation to each other is up to you. Some people prefer to have each stitch look the same. Other people will let each color fall how it may (subject to no twisting) from stitch to stitch.
21. Using Variegated Floss:
Variegated floss is used to create interesting effects and one-of-a-kind pictures. While you are always free to do as the spirit moves you, there are some more organized approaches. The following is one method, but is by no means the only one. Read DMC's pamphlet #15235 "Cross Stitch with Variegated Floss" for information on another.
Remove the floss from the skein and wind it lengthwise around a yardstick. Those of you living in countries on the metric system might have to saw a few centimeters off the end of a meter stick. Carefully cut the floss at the middle and at each end, to give you four groups of floss. Two groups should be lighter and two should be darker, overall. Combine the two lighter groups together and consider them to be one group. Do the same with the two darker groups. As you stitch the design, complete each X as you go.
22. French Knots:
This FAQ focuses on counted cross stitch, but there is one other stitch that should be discussed. That is the French Knot. It shows up in many counted cross stitch designs.
To make a French Knot:
- Bring the needle and thread up from the back to the front of the fabric at the place where the knot is to be made.
- Put the point of the needle back into the fabric a very short distance away from where it came up. Don't pull the needle all the way through to the back. On linen, the distance would be one fabric thread. On Aida, poke the needle into a neighboring square.
- Wrap the thread twice around the needle and pull it tight.
- Continuing to pull it tight, slide the two wraps down the needle until they are against the fabric. At this time, it should look like a French Knot with a needle sticking through it.
- Holding the knot tight, finish pulling the needle and the remaining thread through to the back of the fabric.
23. Beads:
It is common for designs to require beads. Beading should be done after the cross stitching and backstitching.
The thread may be beading thread, floss that matches the color of the bead, floss that matches the color of the background fabric, quilting thread, or any kind of transparent thread. Each will produce a different effect, with a light-colored thread brightening the bead's color and a dark colored thread deadening the color.
The needle may be a beading needle or a #28 tapestry needle.
The simplest method to attach a bead is with a half stitch or quarter stitch.
One method to keep the beads from drooping or sliding requires two strands of floss. Attach the bead using a half stitch, coming up through the first hole, through the bead, and down through the second (diagonal) hole. Then, come back up through the first hole, split the two strands of floss around the bead so one goes on each side, and go back down through the second hole.
Another technique, which is said to work well for a row, starts with the beads attached along the row with half stitches. At the end of the row, the thread is run back to the beginning by going through the beads, above the fabric.
Yet another method uses a full cross stitch. Attach the bead using a half stitch, then complete the cross stitch while going through the bead again. The order and direction of the two half stitches determines whether the hole in the bead points side-to-side or top-to-bottom.
24. Signing and Dating:
Should you sign and date your work? If it is intended to be entered in a competition, possibly not. Find out the rules first. Otherwise, go for it! Be proud of your skill. Signing can make a piece more valuable as the years go by.
Samplers usually incorporate the stitcher's initials and the year into the design. All other designs require a little more creativity on the signer's part.
Some people use permanent ink and sign on the edge, where it will be hidden by the mat or frame. Personally, why would you want to hide this interesting and valuable information?
Some people find a way to stitch their name and the date with teeny letters, over one or two threads. Try out some variations on scrap cloth until you find a look you like. For a quick and easy way to chart your text use the Crosstitch.com Caption Maker
Don't abbreviate the year. Stitch "2000" rather than "'00." Your stitching may survive you by many years, and even though you may think the project is unimportant, later generations may disagree.
There are several things you can do to make a signature visible but unobtrusive. For example, use a thread color that is only a shade or two darker than the fabric. Or incorporate the signature into a shadow, using the shadow's color. Or put it below an object, using the object's color. Or figure out a way to make it part of the design...
25. Cleaning and Storing:
Obviously, when it comes to cleaning needlework on bibs, towels, clothing and napkins, do whatever it takes to get the piece clean. If this means throwing it into the washing machine with detergent and bleach, so be it.
However, the heirloom-to-be deserves special treatment or it may become the heirloom-that-never-was. Here are some suggestions that are very conservative and cautious. It is safest to list many things that a stitcher might want to know. You are then free to use or ignore whatever you choose.
While you are stitching:
- Always wash your hands before stitching, and keep them clean while you work. Don't use hand lotion before stitching. Keep your hands out of your hair, off your face, out of the popcorn, away from the pizza and far from the chocolate bar. See section "26. Soft Hands" for information on how to overcome the effects of all that washing.
- No smoking near the project.
- Watch out for ink from highlighters, and toner from photocopies.
- Needlework projects, especially those in scroll frames, make very nice cat beds. You may choose to view any fur that works its way into the project as part of the design. If not, try using a lint remover or tweezers.
- Don't store linens or fine fabrics in plastic for the long term. The plastic can trap moisture and, over time, release chemicals. However, storing projects in plastic while they are in progress can help to keep them clean. This is assuming it takes less than 5 years to complete the project :-).
- If you want to store a project-in-progress for a more than a few days, roll it rather than fold it. Wrap it in cloth, preferably white.
- If you use a hoop, remove the project from the hoop after every stitching session.
- Put your project in the hoop or bars backwards. This method is sometimes called having the project "in the well." It prevents the front of the design from touching anything when the bars are set down. It also provides more room on the back of the project for ending threads.
-
Try not to hold on to the project in a way that leaves your hand touching the
front of the fabric. For example, fold any extra fabric forward and hold the
project there. Some people like to use a layer of tissue, white flannel or
plastic wrap on top of the project, with an opening in the center to stitch
through. These can be fitted into a hoop, and provide something to hold onto.
-
Pam Holmes, suggested...
I am right handed and usually hold my work with my left hand. To prevent stains, I wear a white cotton glove on my left hand. It works wonders :) I just completed a bell pull (6 months of regular contact) and there were no dark stains lurking anywhere :}
-
Pam Holmes, suggested...
When you are done stitching:
- Launder the project when completed, unless you used non-colorfast fabric or fibers. No matter how often you wash your hands before stitching there will be skin oils left which may cause stains and damage later on.
- Avoid anything which cause the project to have long term (many year) exposure to chemicals.
- Do not dry clean if at all possible. The chemicals can be gritty and may have long term effects. If the piece is lost at the cleaners, you will only be reimbursed for the cost of the materials. Some fabrics and fibers (wool and silk) may require dry cleaning. If this is the case, go to a very reputable cleaner, and have a long talk about the best way for them to do the cleaning.
-
Hand wash each piece individually in cold or lukewarm water. For extremely
delicate objects, use room temperature distilled water.
To clean, use something which is pH balanced and has no whitening agents. This means something like Orvus paste (also used for washing horses and cows), Quilt Soap (which is Orvus soap packaged in small containers for people who don't need a gallon of it), Treasure Wash, etc. Orvus is actually a trade name for sodium lauryl sulfate. Try using one teaspoon per gallon of water. Do not use Woolite, strong detergents or chlorine bleach as they may make the colors bleed. Let the project soak for several minutes. Rinse thoroughly, but don't scrub or wring. If the colors run, repeat the process immediately until the water rinses clear. -
Remove the piece from the water and place it on a clean, white, terry cloth
towel. Roll it up like a jelly roll, to remove the excess water.
Unroll it while still damp, lay it face down on a couple of towels and iron with a dry iron at the wool or linen setting until it is dry. Try not to move the iron back and forth. You may use a pressing cloth, in fact you should use a pressing cloth if there are metallics. The process of ironing until dry prevents uneven drying and puckering of the cloth and threads. Let the project air dry another 24 hours before framing.
Catastrophe
When catastrophe strikes, all the tips listed above should be ignored. Just do what you have to. People on this newsgroup have used detergent, bleach, hydrogen peroxide, Goop and ice to remove soda pop, rust, mold, vomit, catsup and bleeding dyes.
Bleeding Floss
You look down at the lovely counted cross stitch picture that took you six months to complete. To your horror, you see that the dye from one of the floss colors has "bled" onto the fabric. What to do?
You may be out of luck if the fibers aren't washable. But if they are washable, or if you decide that things are so bad you have nothing to lose, try the following.
If the bleeding happens while you are washing the project, don't let it dry. Rinse and soak the project in cold water. Keep rinsing and soaking it until the bleeding is gone and the water rinses clear. The process could take a few minutes or several hours.
If you see bleeding on a dry project, put very cold water into your sink or a flat, nonmetallic pan. Have the water just deep enough to cover the project as it lays flat on the bottom of the sink. Pour in a layer of ice. Let everything soak without any scrubbing. Replace the water and ice as needed. The process could takes days.
Rust
From melaina, who posted using a friend's account, on treating rust stains:
...I had a brand new white cotton sweater that was laid to dry over a chair
(dumb I know) but it had about 20 different rust spots on it some were
about 1 inch square. Anyway my mom found a remedy in an old stain guide.
AND IT WORKED!!!!! First make sure to test it that it does not make the
color run or fade. Here it is.............
MIX 1 TEASPOON OXALIC ACID IN ONE CUP HOT WATER
I just dabbed the stains with a clean cloth soaked in the solution and then
they faded away to brand new white again. After it dried I washed it and
all was fine. I have washed the sweater a few times and the stains have not
reappeared. I do not know what this will do to needlework cloths or if it
will cause any premature discoloration or breakdown of the fabric though
in some cases it may be worth a try, huh.
oh yeah, you can buy the oxalic acid at a pharmacy, or a chemical place. It
was really inexpensive ($0.79 canadian for 25 grams).
Scorch Marks
People on the rec.crafts.textiles.needlework newsgroup have suggested the following for the removal of scorch marks. Try these only if you are facing a catastrophe, as they may affect the colors.
- White vinegar or lemon juice.
- 1 teaspoon of bicarbonate of soda in 1/2 cup of cold water.
- 3-percent solution of peroxide. This could bleach the fabric, so only use it on whites
Pencil
For pencil marks, try an art gum eraser available from most art supplies stores.
Miscellaneous Stains
From Nancy Cope ...
1. Your saliva will remove YOUR blood.
2. Hair spray will remove ink--doesn't have to be ball point. Doesn't
work on all fabrics. Her husband has ruined two shirts that the caps came
off pens in his shirt pockets (woven cotton/poly). One went through the
wash before being spotted; the other got treated before washing and it did
lighten it but not remove.
3. Peanut butter gets off some sticky stuff like residue from tags and
chewing gum. Don't rub too hard, though, as it is an abrasive and will
scratch. A blow dryer will work on some sticky things that can take the
heat, too.
Mary L. Tod ... credits Barbara Knaupf, the owner of The Stitching Post with the following recipe:
This is the magic recipe I got from the Stitching Post when I discovered blotchy green stains all over my "Angel of Grace" at the time I took it in for framing. (The stains were a STUPID error caused by my using a brand-new, never been washed, green towel to dry). I just about lost it when I noticed all the spots. The recipe worked like a charm! Piece was saved, and so was my mental health! Here goes:
- 2 Tbsp Ivory Snow
- 1 Tbsp Snowy Bleach
- 1 gal warm water
Make however many gallons-worth to cover your fabric, and soak overnight, or for as long as it takes! Mine came out in 24 hours. I don't know if this will do the trick for hi-liter, but they don't call it *magic* for nothing!
Tyrie J. Grubic ... reported a cleaning method that was discovered at Cross Stitch Corner in Bellevue, Washington, when attempting a last-ditch, nothing-to-lose stain removal:
Anyway, it works, does *not* damage the piece at all, does not cause any
bleeding of colors, etc...Here's the method:
First of all, store the Goop in the fridge. Goop kept at room temperature
after being opened will break down in a few months and be useless. Do
*not* use this broken-down version on your piece.
On a clean, flat surface, spread out the piece, backside up. Cover it in
Goop. Lather it on. On any especially dirty places, or any places where
the stitching is dense, place it on the front side as well. Leave it for
30 minutes. If you won't be able to get it back in 30 minutes, put it
in a plastic bag, but leave it open, or it will get moldy. Do not leave
it in the bag very long.
Using cold water and a mild liquid soap...rinse the goop out. Continue
rinsing in clear, cold water until the water is
clear.
From there, continue as recommended earlier and press between clean, white towels.
26. Soft Hands:
Many people find that their efforts to keep their hands clean to protect the needlework results in another problem--dry hands.
Sometimes a cream or lotion must used. This shouldn't affect your needlework if care is taken. The most important characteristic of any cream you choose to use is that it not be greasy.
People on the newsgroup recommend Au Ver a Soie Hand Lotion, Acid Mantle Lotion, and Udder Cream.
Udder Cream was developed for use on cows' udders, hence the name. It is available in feed stores and, increasingly, needlework shops.
There is sometimes confusion about what is and what is not Udder Cream. It is not the same as Bag Balm. In fact, different products are sold under the name of Udder Cream, and not all are kind to needlework.
Excerpted from a posting by Tara R. Scholtz ...
...I've found three! And all have green metal tins!!! The one with the
strawberries (?) is the greasy stuff. It's also yellow (the strawberry
tin that is). The strawberry tin and its bigger counterpart is marked
trademarked by one company (forget which one) and that is only mentioned
in *some* publications, I couldn't find that trademark - but the name is
used by other companies anyways. Farnham has its own bag balm - the green
tin for that also says bag balm. Real confusing.
...Not always - the blue Udder Cream (same name, different company) is
*very* greasy. In my horse & livestock catalogues and stores I have so
far found about 5 different concoctions of "Udder Cream." If you want
the non-greasy stuff (and want to make *sure* it is the non-greasy stuff
before buying several pounds of it), just stick to the little
cow-decorated jars found in stitchery stores.
...Horse products don't seem to undergo *any* sort of regulation (ya'll
gotta go see the horse shampoos and conditioners, they're almost
outnumbering the drug stores! I about *died* when Jeri Redding jumped in
on the bandwagon & produced his own line of equine shampoo, etc.). Many
items are not trademarked and are considered fair game by other companies
when it comes to naming a product. Hence, livestock supply catalogues
list the manufacturer as well as the product name. (Which is why I spent
a fortune trying to find "Udder Cream" - only to find I can only get the
one produced by Redex at the stitchery stores near me.)
...If you want Bag Balm, watch out for the YELLOW stuff - that's greasy and
no good for stitching. Still great for hands though.
If you want Udder Cream - get Redex Industries. It SHOULD be WHITE.
AVOID BLUE & YELLOW.
Excerpts from another posting by Tara R. Scholtz ...
The white stuff by Redex Industries, Inc. is used as hand lotion. It is
greaseless and stainless but does contain lanolin & allantoin (which
causes problems for some people)...
There are other hand lotions available in the needlework market which are
also touted as greaseless and stainless but does NOT contain lanolin.
One is called "Creative Hands" (with aloe vera)...
27. Mounting, Matting and Framing:
Not all needlework needs to be framed like a picture. Needlework can be found on pillows, linens, clothing, box lids, jewelry, light switch plates, and so on.
While you may not think the twenty little holiday ornaments you finished late last night have great value, this is not your decision to make. Fifty years from now, they may be someone's pride and joy. And you don't want to be the person who messes up someone's priceless collection of early twentyfirst century needlework, do you?
If you are going to frame your project, here are some suggestions. They are very conservative and cautious. It is safest to list many things that a stitcher might want to know. You are then free to use or ignore whatever you choose. If you take your work to a shop to get it framed, ask the people there if they do conservation framing. Make sure they are aware of the following issues.
- Don't do anything which cannot be undone several years later.
- Avoid anything which cause the project to have long term exposure to chemicals, metal or acid.
- Cut any selvage edge before framing.
- Zig-zag each edge, or stitch unbleached muslin to each edge.
- Use acid free foam core or acid-free white mat board as a backing. These are available in framing stores, art supply stores and office supply stores. Have it cut at the store, or use an X-acto knife at home. Make it 1/8 inch smaller than the frame you will be using. Avoid normal cardboard and paper, as they have high acid contents. The acid can damage fabric over time. Do not use sticky board. The chemicals can damage your fabric, and the glue can provide lunch for bugs.
- Center the piece on the backing. Fold the extra fabric to the back and tuck in the corners. The fabric on the front should be taut but not stretched. You may want to use straight pins pushed into the edge of the backing to temporarily hold the fabric in place. Use unwaxed dental floss, quilting thread or some other strong thread to lace the fabric to the backing. Lace the long edges first, sewing from the left to the right and back to the left, somewhat like lacing a shoe with only one end of the shoe lace. Keep the stitches about an inch apart. Make sure the thread is evenly tight. Repeat the lacing for the short edges. Remove the pins, as even rust-free pins may rust over time.
- If you use matboard, make sure it is acid-free rag matboard. Consider using acid-free rag matboard even for double and triple matted pieces, where not all of the matboard is touching the fabric. The regular matboard ages much faster, and it releases fumes.
- Should you use glass? As with everything else, it's up to you. On the one hand, glass can protect against dust and pollution. On the other hand, it may trap moisture and cause mildew. If you use glass, make sure it does not touch the needlework. Spacers or matboard are good for this. Regular glass is O.K. Standard non-glare glass is bad, as it actually lets more ultraviolet light in, and may release chemicals. Conservation glass or UV glass is very good, but expensive. Figure out how much the project is worth to you, and be willing to pay accordingly.
• Top • Chapter 1 • Chapter 3
• Crosstitch.com home